Pipe Markers Guide: Everything You Need About Pipe Marking and Labeling
Does your facility have pipes?
If so, those pipes need labels. While pipe labeling may seem like a confusing process with many requirements, it doesn’t have to be difficult. Starting with a plan will make your pipe-labeling project easier and more organized. Then once your facility’s pipes are labeled, you’ll see communication about pipes improve. Using visuals like labels makes communication direct and simple, and it reduces the need for asking questions about pipe contents.
Before you begin marking pipes, you should understand the basics of pipe marking. Take a look at these seven things you should know before you begin the pipe-marking process.
7 Things You Should Know about Pipe Marking
1. Workers Need to See Pipe Labels, and So Do Emergency Personnel
Labeling pipes will primarily help your workers and any maintenance personnel who may need to service pipes. Therefore, you’ll want to keep this main audience in mind when you establish your pipe labeling system.
It’s possible you’ll have additional people who enter your facility and need to know what’s in your pipes, though. In an emergency situation like a fire, emergency responders may need to know which pipes contain fire-quenching liquids. If an accident involving a pipe containing chemicals occurs, an emergency response team would quickly need to know what chemicals it’s dealing with. Because these additional members of the community may be reading your pipe labels, it’s important to follow industry standards for pipe labeling instead of having an internal system that only your workers understand.
2. Colors Should Be Standardized
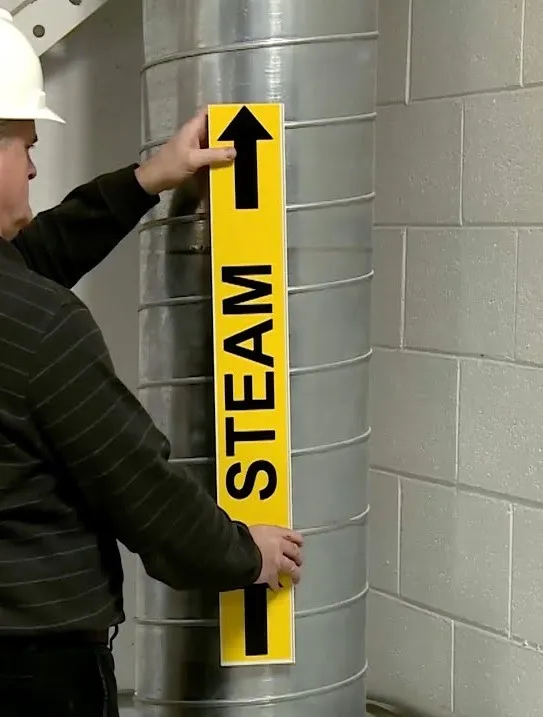
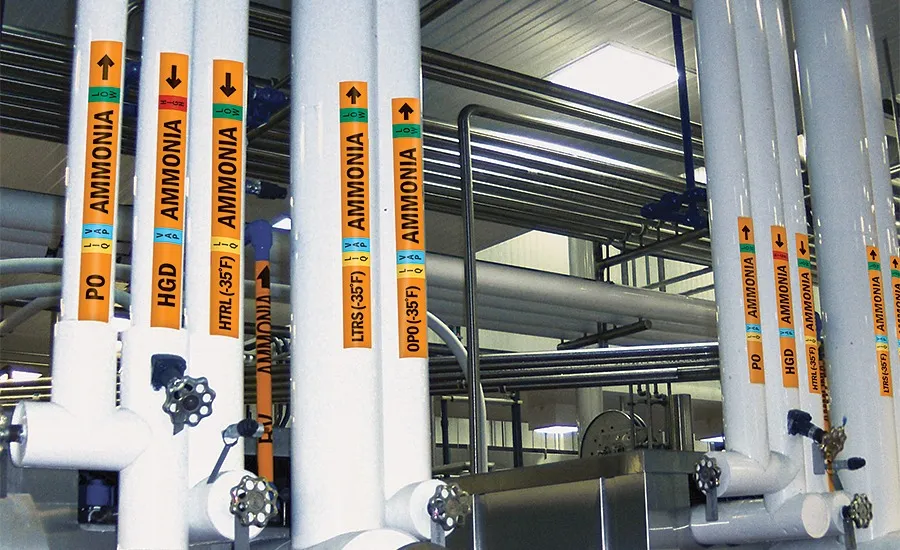
To make it easy for workers, emergency responders and other pertinent personnel to read and understand pipe labels, the labels should be color-coded according to the ANSI/AMSE 13.1 standard. The standard assigns six main colors for pipe contents:
- Yellow Background with Black Text – Flammable Fluids & Gasses
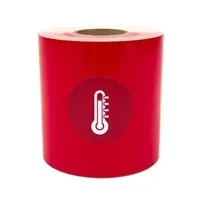
- Red Background with White Text – Fire-Quenching Fluids
- Orange Background with Black Text – Toxic or Corrosive Fluids & Gasses
- Green Background with White Text – All Water
- Blue Background with White Text – All Air
- Brown Background with White Text – Combustible Fluids & Gasses
Four additional colors exist that facilities can assign as needed:
- Purple Background with White Text
- Black Background with White Text
- White Background with Black Text
- Gray Background with Black Text
These standardized colors are recognized across many industries and make it possible for people familiar with pipes to know what kind of substance is inside a pipe without even needing to read the label’s text.
3. Dimensions Matter
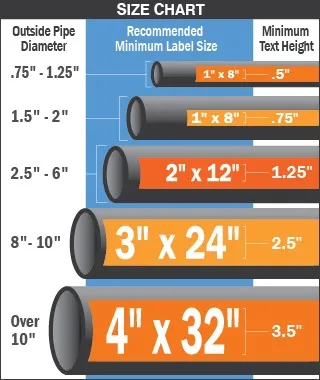 Pipe labels must be large enough that they get noticed. This means they need to be larger on larger pipes so they are not overlooked. As you can see in the chart below, the required length of a label depends on the diameter of a pipe, as does the height of the text on that label. Follow these guidelines when ordering or printing your pipe labels so your labels are the appropriate sizes.
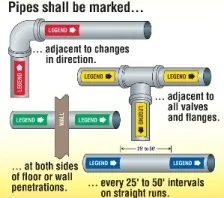
4. Some Locations Are Required
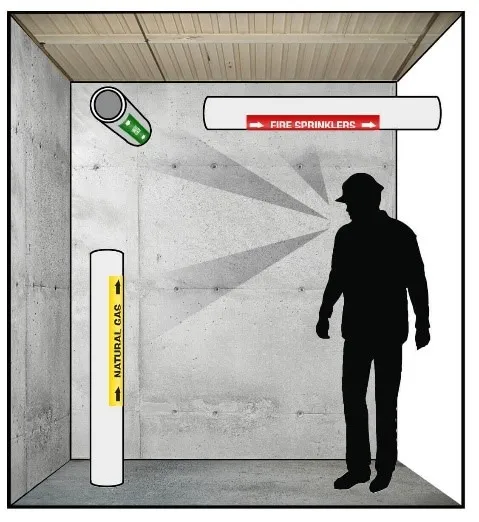
ANSI/ASME standards state that pipe labels should be placed in four main locations. On straight sections of pipe, they need to be placed every 25 to 50 feet. Labels also need to be placed at all changes in direction, on both sides of entry points through walls and floors and next to all valves and flanges. Remember that at a minimum labels need to be placed in these locations.
 You may find that your facility would be more easily navigated with additional labels because of the locations of machinery, shelving or other equipment that might reduce pipe visibility.
5. Placement on Pipes Increases Visibility
 Once you know which pipes need labels and where those labels need to be located, applying a label should be pretty straightforward. Don’t forget, though, that you’ll want to place labels on pipes at angles that are easily readable from an employee’s line of sight.
If a person enters a room and looks up at a pipe on the ceiling, the best place for the label might not be exactly on the bottom or side of the pipe. Placing a label below the pipe’s centerline could make it easiest for the person to read the label. Consider which angles will be most appropriate for your facility.
6. Labels Need to Hold Up to Pipe Conditions
 Some pipes in your facility may be very hot, very cold or occasionally exposed to chemicals. Others might be subjected to UV rays constantly. Many labels can withstand these harsh conditions, and if you print labels yourself, you can purchase a durable label supply that will work well for most pipe marking situations.
If you do have pipes that get extremely hot (or face other extreme conditions), purchase a label material suited to the job. High temperature label supply, for example, is ideal for labeling hot pipes.
7. Making Labels Yourself Might Be Most Economical
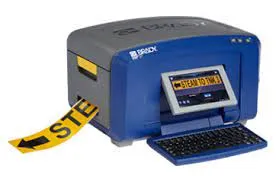 As mentioned above, it’s possible to order pre-made pipe labels or print them yourself. In most cases, printing labels yourself will save you money in the long run, especially if you need to create labels for a large facility. Industrial label printers can make the pipe-labeling task easy, and if you run out of labels or need to create unique labels, you’ll have no problem doing so. For example, if your workplace decides to assign specific uses for purple or gray labels, you’ll easily be able to make these labels on-site.
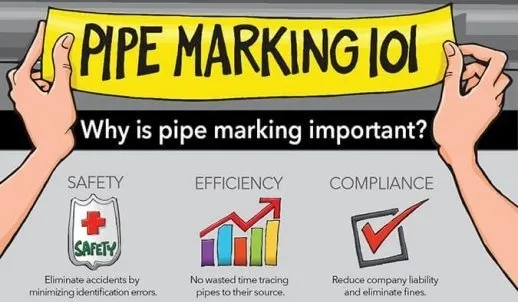
How does pipe marking increase safety?
In its simplest form, pipe marking is an easy way to display the contents and operating temperatures of your piping system. A quick glance will tell maintenance, engineers and other employees which safety precautions to use before handling the piping or making repairs.
When done right, pipe marking increases the safety of your facility in several ways. Clearly labelling with chemical names lets employees look up relevant MSDS data quickly. Colour-coding systems that show hazard levels tell you what to do if a pipe is leaking. Label your piping system with flow direction arrows, and your staff will know which direction to look when they need access to shutoff valves.
Are pipe labels required by law?
Several organisations require compliance with pipe marking standards. Chief among them is OSHA. It’s an unenforced rule, which means that you are not likely to face severe fines or penalties for failing to mark your pipes, but OSHA does require that facilities label pipes according to the ANSI A13.1 standard.
Other standards are not required by law, but they are necessary for your facility to receive certification from standardisation organisations. These include ISO 14726 and British Standard Institution 1710 or European Standard EC Directive 92/58/EEC for European companies.
How to mark pipes ?
To bring your pipe labelling system up to ANSI standards, you’ll need to be aware of several factors, including label colours, locations and the sizes of both the labels and the lettering. Proper label sizing is important for two reasons: Larger labels offer maximum visibility, but if they exceed certain sizes, pipe curvature will obscure the lettering.
 For example, pipes that are an inch or less in diameter need labels that are 1-1/8 inches high and 4 inches wide, with lettering that is at least 1/2 inch tall. Pipes that are 8 inches and larger need to have labels that are 4 inches by 20 inches, and the lettering should be 3 1/2 inches high.
ANSI standards also dictate the colours you’ll need to use based on the contents of the piping system.
- Red with white text is for fire-quenching liquids.
- Orange with black text is for corrosive or toxic fluids.
- Yellow with black text is for flammable liquids.
- Brown with white text is for combustible liquids.
- Green with white text is for all water lines.
- Blue with white text is for compressed air.
In some facilities, British marking standards are used in conjunction with ANSI standards. British standards use color bands to denote the contents, temperature and hazard level of the pipe. A boiler line would have a central white band signifying water, two flanking red bands to tell employees that the water is hot, and outer green bands to show water’s low hazard level.
Pipe marker placement is just as important as the colors and sizes. According to ANSI standards, pipes must be marked at each of these locations:
- Wherever a pipe emerges from or exits through a wall, floor or ceiling.
- To either side of bends, tees and other joints.
- To either side of flanges, valves and other hardware.
- Every 25 to 50 feet on straight stretches.
- Anywhere the label will be visible from a normal vantage.
Important Considerations for Pipe Marking Projects
Visibility
The visibility of pipe marker labels is paramount, because if they can’t be seen clearly, they have little use for anyone. Once the piping layout has been set, carefully consider how each supply line moves within the facility including the entry and exit points for each room. Pipe markers will need to be placed at regular intervals along each pipe as dictated by industry standards, and it’s important to get an accurate count of label quantity based on the various sizes required. This will help you properly plan for adequate visibility of the labels on the piping throughout the building.
Cleanliness
Cleanliness is especially important for certain parts of your facility, such as access hallways or sub-floors that may not be accessed often. You want to make sure that pipe markers are not placed in a location that can get easily covered by dirt, grime, or moisture. It is also helpful to develop an adequate maintenance plan that will ensure that these locations are checked regularly for any deteriorating conditions that may impact the ability to read important signs and labels.
Pipe Conditions
Some pipes may be carrying particularly hazardous materials, such as those which are corrosive or others kept at high temperatures. You want to select a pipe marker label material that can withstand the expected conditions. An improper label that is placed on a hot pipe could quickly deteriorate and lead to reduced readability. Another example may be a label that is placed on a pipe that is exposed to long periods of direct sunlight, which can cause a label to fade, which also reduces readability. Ultimately, in the case of a safety incident or leaky or burst pipe, it is helpful to have pipe markers that can withstand potential exposure to the materials within so that safety personnel can properly identify the material and contain the spill.
When properly organized and planned, pipe marking can be a very straightforward and valuable process for facilities of all types. Since regulations are updated over time, it’s important for management at any site to stay up to date on the latest developments and best practices. By selecting and applying proper pipe marker labels to your supply lines, you will ensure that you are in compliance with regulations and can depend on your safety awareness procedures for years to come.
ANSI/ASME Pipe Marking Requirements
 In addition to the color-coding scheme mentioned above, the standard ANSI/ASME A13.1 also includes requirements for the content, sizing, and placement of pipe markers. The overall goal of these guidelines is to ensure that all pipe markers placed within a facility are visible and easy to read. Any confusing or missing information could put a site at risk.
Content
The pipe marker must include additional information that can be used to identify the exact material that is present within the pipe. Users can choose from any combination of full name, abbreviation, or chemical symbol to identify the pipe contents. This is in addition to any appropriate code indications or code color bands that may be used. Some locations also choose to add a CAS# to the pipe marker for specific confirmation of the exact contents. In addition, an arrow should be placed on the marker to indicate the direction of flow.
Sizing
Since pipes can come in a variety of shapes and sizes, the specifications also define the proper sizing of a pipe marking. The size of a pipe marking label is set based on the pipe diameter as follows:
- ¾ – 1 ¼” = at least 8” in length and ½” in height
- 1 ½ – 2” = at least 8” in length and ¾” in height
- 2 ½ – 6” = at least 12” in length and 1 ¼” in height
- 8 – 10” = at least 24” in length and 2” in height
- >10” = at least 32” in length and 3” in height
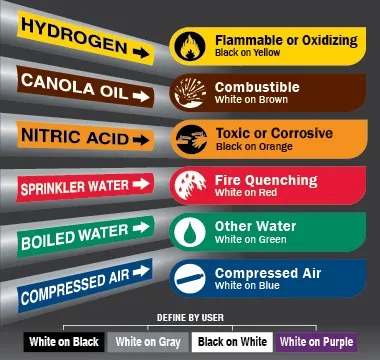
What Do Pipe Colors Mean?
ASME/ANSI A13.1 defines the coloring of pipe markers in a chart that includes the following designations. For hazard classification purposes, the most hazardous component of any piping line should dictate the color that is chosen.
- Red (white text) = Fire-quenching substances
- Orange (black text) = Toxic and Corrosive materials
- Yellow (black text) = Flammable or Oxidizing fluids & gasses
- Brown (white text) = Combustible fluids & gasses
- Green (white text) = Water
- Blue (white text) = Compressed Air
- Purple (white text) = user-defined
- White (black text) = user-defined
- Gray (white text) = user-defined
- Black (white text) = user-defined
Does OSHA Require Pipe Labeling?
OSHA remains the central resource for workplace safety in the U.S., and its guidelines cover a wide range of topics. While OSHA does specify requirements for many areas, they may also reference other standards instead of creating their own. This is the case for pipe marking, as the standard OSHA 1910.261(a)(3)(ii) simply refers to ANSI standard A13.1 without detailing any additional requirements set forth by OSHA.